

That annoying creaking sound from your floors can really get under your skin. It’s like a little soundtrack to your home that you didn’t ask for. Old houses, especially, seem to have this special talent for making noise every time you walk across them. But don’t worry, you don’t have to live with it. There are some pretty clever ways to fix old creaky floors using modern techniques, and many of them you can even do yourself. Let’s figure out how to get your floors quiet again.
Key Takeaways
- Squeaky floors often happen because of friction between boards or loose connections to the joists below.
- You can fix creaky floors from above by using special screws or by lubricating the gaps between boards.
- Working from below your floor can be more effective for long-term fixes, using shims, adhesive, or blocking.
- For carpeted floors, specific kits allow you to fix squeaks without removing the carpet.
- While DIY is often possible, complex issues or valuable floors might need professional attention.
How to Fix Old Creaky Floors
Dealing with floors that creak every time you walk on them can be a real pain. It’s like a constant reminder that something isn’t quite right underfoot. But don’t worry, there are plenty of ways to tackle these noisy floorboards and get your home back to a peaceful state. The good news is that most creaky floors can be fixed without needing a complete overhaul.
First things first, you need to figure out why your floors are making noise. Often, it’s just friction between wood pieces rubbing against each other, or maybe a board has come a little loose from its support. Sometimes, it’s a gap between the floor and the subfloor, or even issues with the joists themselves. Identifying the source is key to picking the right repair method.
Here are some common ways to stop floor creaking sounds:
- Lubrication: For simple friction squeaks, try sprinkling powdered graphite or talcum powder into the gaps between floorboards. Walk on the area to work it in, then wipe away the excess. It’s a quick fix that often works wonders.
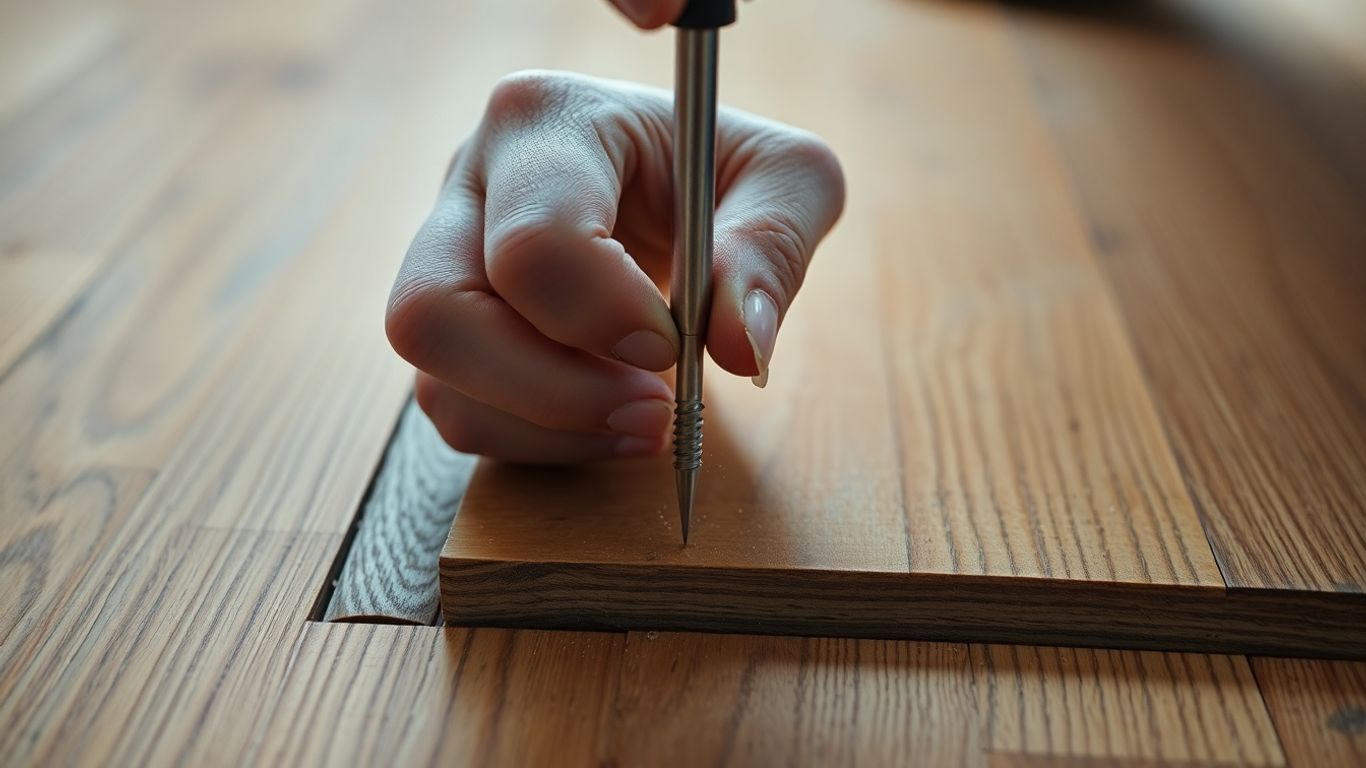
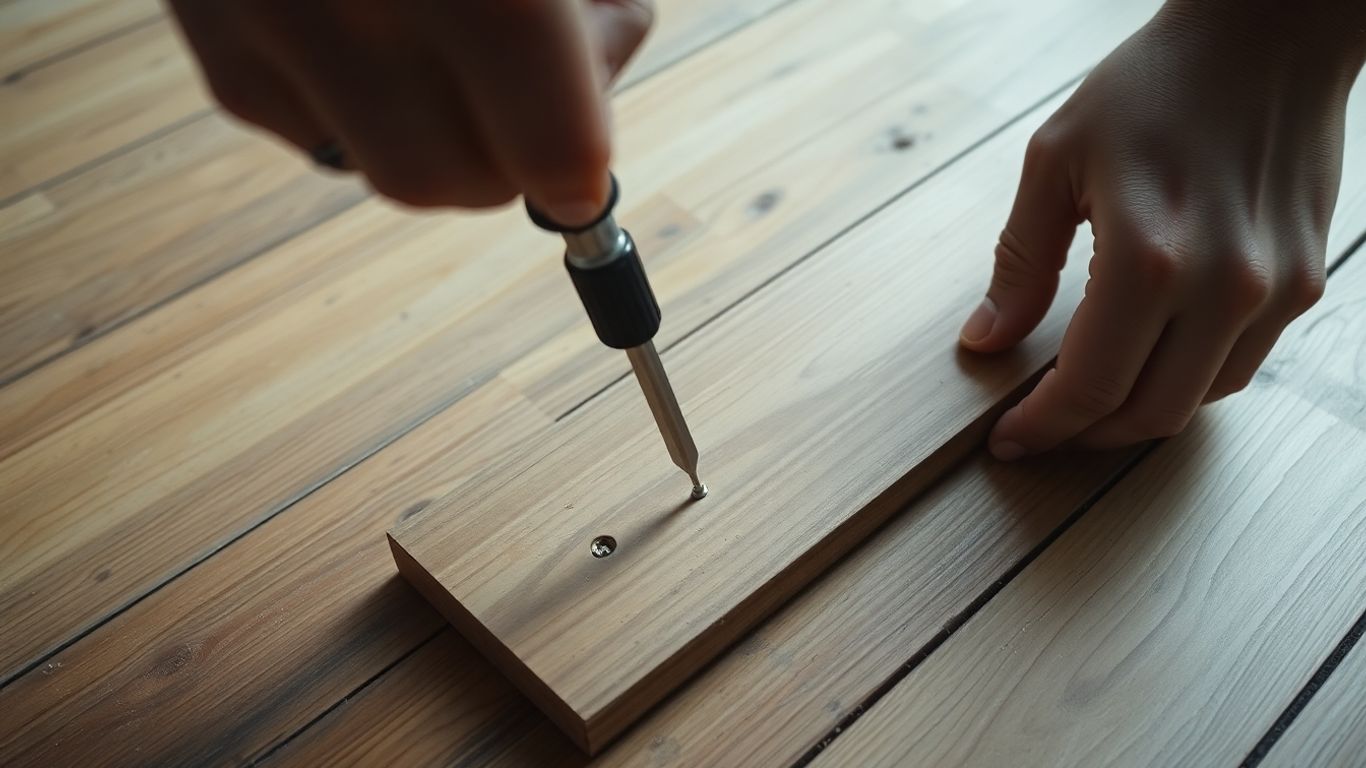
- Securing Loose Boards: If a board is loose, you can often fix it by driving screws through it into the subfloor. Make sure to use screws that are long enough to get a good grip but not so long they poke through the other side. Then, fill the screw hole with matching wood filler.
- Shimming from Below: If you have access to your basement or crawl space, you can look for gaps between the floor joists and the subfloor. Gently tap a thin wood shim with some glue into these gaps to stabilize the floor and stop the movement that causes squeaks.
- Specialized Kits: For a cleaner look, especially on hardwood, there are kits available that allow you to drive screws that snap off below the surface. You then fill the tiny hole with putty, making the repair almost invisible.
Sometimes, the simplest solutions are the most effective. Don’t underestimate the power of a little powder or a well-placed screw when it comes to silencing those annoying creaks.
Whether you’re dealing with noisy bathroom floors or creaky living room planks, these methods can help you achieve silent squeaky floorboards. Remember, pinpointing the exact location of the squeak is the first step to a successful repair noisy hardwood floors project.
Why Floors Become Creaky Over Time
So, what’s the deal with those annoying creaks? It usually boils down to a few things happening under your feet. Wood, as you know, isn’t static; it moves. It expands when it’s humid and shrinks when it’s dry. Think about the seasons changing – that’s a big factor. When the air gets dry, especially in winter with the heating on, the wood in your floorboards and the subfloor can shrink a bit. This creates small gaps.
These gaps are where the trouble starts. When you walk on the floor, the boards can rub against each other, or the subfloor can move against the floor joists. It’s this friction that makes that familiar squeaking sound. It’s like a tiny, noisy dance happening between the wood pieces.
Here’s a breakdown of what typically causes it:
- Wood Movement: As mentioned, humidity changes cause wood to expand and contract. This is a natural process, but it can lead to looseness over time.
- Loose Fasteners: The nails or screws that hold your floorboards and subfloor down can loosen up. This happens because of the constant expansion and contraction of the wood, and just general settling of the house.
- Gaps Between Components: When there are small spaces between floorboards, or between the subfloor and the joists, movement is more likely, leading to squeaks.
It’s not just about age, though. Sometimes, even newer floors can creak if they weren’t installed perfectly or if the materials weren’t top-notch. The environment plays a huge role, too. If you live somewhere with wild humidity swings, your floors are going to feel it.
Understanding these causes is the first step to figuring out how to fix them. It’s a bit like understanding why your car makes a funny noise before you take it to the mechanic. For a deeper look at the mechanics, you might find resources on fixing floorboard squeaks helpful.
Modern Techniques to Fix Old Creaky Floors
So, your floors are making that awful squeaking noise again. It’s super annoying, right? Luckily, there are some pretty neat ways to deal with it these days, way beyond just stuffing newspaper in the cracks. We’re talking about actual fixes that can make your floors quiet again.
First off, you gotta figure out why it’s creaking. Most of the time, it’s just the wood rubbing together, or maybe a loose board. Sometimes, it’s a bit more involved, like a gap between the subfloor and the joist. Knowing the cause helps pick the right fix.
Here are a few popular methods:
- Lubrication Method: For quick, temporary relief, you can try sprinkling powdered graphite or talcum powder into the gaps between floorboards. It’s not a permanent fix, but it can quiet things down for a bit, especially for surface-level friction. It’s a good first step if you’re just trying to get through a dinner party without embarrassment.
- Shim and Adhesive Method (from below): If you have access to your basement or crawl space, this is a really effective way to fix things. You find the gap between the subfloor and the joist, coat a thin wood shim with glue, and gently tap it in. The trick is not to force it too much, or you’ll create a bump upstairs. This addresses the structural cause of the noise.
- Specialized Screw Kits (from above): For when you can’t get underneath, there are kits designed for fixing squeaks from the top. These kits use special screws that go through the flooring and into the joist, and then snap off below the surface. For hardwood, you fill the tiny hole with matching wood putty. For carpeted floors, these kits are almost invisible. This is often the best bet for DIY floor noise solutions when working from above.
Fixing creaky floors can feel like a puzzle, but with the right approach, you can silence those sounds. It’s about understanding the cause and choosing a method that fits your situation, whether it’s a quick fix or a more permanent structural repair. Don’t be afraid to try these modern techniques; they’re designed to be effective and, with care, can be nearly invisible.
When you’re dealing with specific areas like kitchen floors or even thinking about new flooring installation, the underlying structure matters. Even if you’re just looking at a wood floor repair guide, these techniques can be applied. Remember, for valuable or historic floors, or if you’re just not comfortable tackling it yourself, calling a pro is always an option. They have the experience to handle tricky situations without damaging your beautiful floors.
Maintenance & Care Tips
Keeping your floors quiet long-term is all about a little bit of regular attention. Think of it like taking care of a car; a bit of upkeep prevents bigger, more expensive problems down the road. One of the biggest culprits for creaky floors is fluctuating humidity levels. Wood naturally expands and contracts with changes in moisture, and this movement is what causes those annoying squeaks. Maintaining a consistent indoor humidity level, ideally between 30% and 50%, is key. This might mean using a humidifier during dry winter months and a dehumidifier or air conditioning in the summer. It really makes a difference.
When you’re cleaning, be mindful of how much water you use, especially on hardwood. A damp mop is usually fine, but avoid letting water pool or soak into the wood. Excess moisture can cause the wood to swell and then shrink as it dries, leading to new squeaks or worsening existing ones. It’s also a good idea to periodically check and tighten any visible screws or fasteners, particularly in areas where people walk a lot. This simple check can stop squeaks before they even start. If you notice a small squeak, try to address it sooner rather than later. Little issues are almost always easier and cheaper to fix than ones that have been ignored for a long time. For those dealing with larger projects or considering outdoor renovation, remember that proper floor maintenance is part of the overall home upkeep.
Here are a few more things to keep in mind:
- Humidity Control: Aim for that 30-50% sweet spot year-round.
- Gentle Cleaning: Use minimal water on wood floors.
- Fastener Checks: Periodically tighten any loose screws or nails.
- Early Intervention: Address small squeaks promptly.
Sometimes, the simplest solutions are the most effective. Don’t underestimate the power of consistent, small efforts in preventing major floor issues. It’s about being proactive rather than reactive.
If you’re dealing with widespread issues or notice any sagging along with the squeaks, it might be time to consider professional help. They have the tools and experience to diagnose and fix more complex problems, saving you future headaches.
Why Professional Help Matters
Look, sometimes you just gotta call in the pros. While it’s tempting to save a few bucks and try to fix those creaky floors yourself, there are times when it’s just not worth the headache. If you’ve got widespread squeaking all over the place, or if your floor feels a bit bouncy or saggy, that’s a sign of something bigger going on. Trying to patch that up yourself could actually make it worse, and nobody wants that. Plus, if you’ve got fancy hardwood floors, you really don’t want to mess them up. Professionals have the tools and the know-how to fix things right the first time, and often, their repairs are practically invisible. It might cost a bit more upfront, but it can save you a lot of trouble down the road.
Here’s when it’s probably a good idea to get a professional involved:
- Widespread Squeaks: If the creaking isn’t just in one spot but seems to be everywhere, a pro can figure out the overall problem.
- Sagging or Bouncy Floors: This points to potential structural issues that need an expert’s eye.
- Valuable Flooring: If you have expensive hardwood or other delicate flooring, you want someone who knows how to repair it without leaving a mess.
- DIY Failures: You’ve tried a few things yourself, and the squeak is still there. It’s time to admit defeat and call in reinforcements.
Trying to fix a structural issue without the right knowledge can lead to more damage and higher costs later on. It’s often more cost-effective in the long run to have an expert assess and repair the problem correctly from the start.
Think about it like this: you could try to perform surgery on yourself with a kitchen knife, but you’d probably rather have a trained surgeon do it, right? Same idea here. Getting it done right the first time means peace and quiet for years to come.
Conclusion
So, you’ve learned a few ways to tackle those noisy floorboards. It’s pretty neat how a little effort can make such a big difference in how your home feels, right? Getting rid of those creaks is one of those home improvement wins that you notice every single day. Whether you went with a quick fix from above or a more involved repair from below, you’ve made your living space more peaceful. Plus, you’ve probably stopped those little annoyances from turning into bigger problems down the road.
Remember, wood is always moving a bit, especially with changes in humidity. Keeping your home’s air between 30-50% humidity can really help prevent future squeaks. It’s a simple step that makes a big difference for your floors and the whole house.
Here’s a quick rundown of what we talked about:
- Above-floor fixes: Good for quick results or when you can’t get underneath. Modern screws can be very effective, and with a little care, the repair can be almost invisible.
- Below-floor fixes: These usually get to the root of the problem and are often the most durable. If you have access, it’s a great way to get a lasting silence.
- Prevention: Managing humidity is your best bet for keeping new squeaks from showing up.
Fixing squeaky floors might seem like a hassle, but the quiet you gain is totally worth it. It’s a project that brings immediate satisfaction and makes your home feel much more comfortable.
If you tried these methods and still have stubborn squeaks, or if you just prefer to have a pro handle it, don’t hesitate to call in an expert. Sometimes, having someone with years of experience take a look can save you time and ensure the job is done right. Enjoy your newly quiet home!
In conclusion, we’ve covered a lot of ground. If you’re ready to turn your Home renovation dreams into reality, don’t wait! Visit our website today to see examples of our work and get a free quote for your project. Let’s build something amazing together.
Frequently Asked Questions
What are the basic tools I need to fix a squeaky floor myself?
To get started with a simple fix, you’ll want a stud finder to locate the floor joists, a drill with the right drill bits, and screws that are the correct length for your floor. Having wood filler that matches your floor’s color and a putty knife for a smooth finish will also be helpful.
Can I fix squeaky floors under carpet without pulling up the carpet?
Yes, you can! There are special repair kits designed for carpeted floors. These kits use screws that break off right below the carpet’s surface, so you won’t see any sign of the repair afterward.
What’s the difference between fixing a squeak from above versus from below?
Fixing from below, if you have access to a basement or crawl space, is often better because it doesn’t touch your finished floor and lets you fix the root cause directly. Fixing from above is necessary when you can’t get underneath, and modern screws can still provide great results.
How long do these DIY fixes usually last?
Simple fixes like using talcum powder might only last a few months. However, more permanent solutions like securing floorboards from below with shims and adhesive, or using specialized screws from above, can last for many years.
When should I consider calling a professional to fix my squeaky floors?
You should call a pro if the squeaking covers a large area, if the floorboards move a lot when you step on them, or if you see any damage to the floor structure underneath. Professionals have special tools and experience for tough jobs.
Are there ways to prevent floors from becoming squeaky in the first place?
Regular maintenance is key. It’s a good idea to have your floors checked by a professional every 5 to 7 years. This can help catch small problems before they turn into noisy squeaks that need fixing.
